
Meshtastic for Off-Grid Texting
I recently started exploring Meshtastic for off grid texting. In particular, what frequencies does it operate on? How far is the range? Who is currently using it and for what?
This post is not intended to be a complete “how to” for Meshtastic. This post touches on a very high level overview of the platform and my observations after only a few months of getting started with it.
LoRa – Long Range Wireless
Meshtastic is a communication layer which utilizes LoRa, or Long Range Wireless. LoRa utilizes Chirp Spread Spectrum and in the United States runs at 915 MHz as the center frequency which is designated as an ISM (Industrial Scientific and Medicine) allocation. This designation is for unlicensed use (within the parameters of the FCC and ITU of course).
The ISM band is from 902 – 928 MHz and is used primarily for industrial microwaves, medical equipment and other heating applications. The RF in these cases is unmodulated.
Note that this frequency allocation overlaps with the 33cm amateur band, which we are secondary users of. More on this later.
Long range wireless is a subjective description. For amateur radio operators, “long range” means around the world. In other circles, it might mean a few miles. This makes sense if we consider other non licensed RF allocations such as Bluetooth and WiFi. A few miles is long range compared to these references. In my testing, I have seen at least a one to two mile range with these low power LoRa devices. With height and a decent antenna, I have heard nodes up to 12-15 miles away.
LoRa was developed by Semtech and utilizes low power and entire LoRa chipsets have become popular, making incorporating this RF protocol into a product very easy and very inexpensive. It has also resulted in experimenters boards being readily available.

LoRa can be used to send and receive measurements and readings from instruments such as temperature, location, speed, or just about anything a typical IoT device would send or receive.
The appeal with LoRa is its range and low power usage, which is ideal for battery powered and solar powered devices.
Experimenter Boards
The LoRa experimenter boards come with the radio, an antenna connector, power management (USB input, battery, and/or solar), and pinouts from the CPU for wiring up to a breadboard or another PCB. Some will include an OLED screen, WiFi, Bluetooth, charge controller, and/or a GPS module.

These boards have effectively become a complete and portable LoRa platform with little to no real assembly needed. Unlike typical “kits”, these require mechanical assembly at most, such as fitting into a case or connecting an antenna and a battery.

Of course there are components available that require more assembly, such as parts from RAKwireless which allow for building a node for a specific purpose or application.
Meshtastic on LoRa
Meshtastic is a layer on top of LoRa – a complete software meshing platform which utilizes LoRa for the RF communication.
It is important to note that the Meshtastic software which runs on the LoRa boards supports specific chipsets. Not every chipset is supported and many of these boards are sold with specific mention of support for Meshtastic. Some are pre-flashed with Meshtastic, others are not and can easily be flashed.
When purchasing a board, be sure it is a LoRa RF board and be sure it is listed as compatible with Meshtastic.
Also be sure to purchase a board that is on the correct band for your region. For example, in the United States, this is 915 MHz (or another band such as 70cm, where permitted). You will want to be sure that the band you choose is not only allowed in your region but also where other Meshtastic users would be. For example, at this time, most Meshtastic devices in the United States are on the 33cm band (915 MHz), and not 70cm.
Also be sure the antenna you attach is also designed for the band the RF board operates on. Otherwise you will not get the best range possible. Worst case you can damage the transmitter. Many of these boards can be powered off or shut down by pressing and holding one of the buttons. This should be done (or remove the power source) before disconnecting the antenna. Of course, never power up one of these devices without an antenna attached.
I have found that it is best to open the LoRa settings and disable transmit before shutting down the node and removing the antenna. That ensures that the device will not transmit until you are ready (with the antenna attached).
What can Meshtastic Do?
Meshtastic offers node to node text messaging and “group” messaging. It has the ability to “mesh” or form small networks of nodes to relay messages between them. Simply being within range of other nodes, they form a smart mesh for directed or group messaging.
Since this messaging and mesh protocol sits on top of LoRa, this is entirely off grid. It requires no internet connection nor cellular connection (unless you enable MQTT).
The protocol supports “hopping” or relaying so that a node in between two other nodes can carry the messages between other nearby nodes. This is similar in concept to digipeating for example with APRS. Meshtastic relies on this relaying or repeating for broader messaging networks.

If you have a few nodes around town, each within range of at least one other node, town or city wide communication is easily possible.
There are practical limits to how many hops should be supported when getting a message from one node to another. This setting is named “Hop Limit” and is set to 3 as a default.
A Terminal is Required
Unless your Meshtastic device has a built in screen and keyboard, you will need a “terminal” to not only configure your node, but also to view and send messages.

The most common way to connect to and interface with your node is with a mobile device over Bluetooth with the Meshtastic app. You pair your mobile device with the node over Bluetooth and then use the app to configure the node and to view and send messages.
It is also possible to perform these operations over a serial interface, if your device supports it, which is also how firmware is updated. This serial device is accessible over the USB port on the board.
There is also a web based interface you can use if you have paired your node to a computer via Bluetooth, connected it via USB (using the serial connection) for example, or if you enable the WiFi/Network feature. Note that on most boards I have tried, when you enable WiFi, Bluetooth is disabled since they share the same interface and antenna on the board.
For home or fixed nodes, enabling WiFi (if your board supports WiFi) for the interface is most convenient for interfacing with the node, since Bluetooth has a much more limited range. WiFi would allow the device to sit on your network, and make it accessible anywhere you are in the house or building, even when remote if you have VPN access into your network.
For portable nodes, Bluetooth is the most convenient option for connecting to the node.

The most convenient option would be a device with not only the LoRa board but a keyboard and screen. However, since most of us carry a mobile device in our pockets, a smaller LoRa board inside a small case fits in the pocket just as easily.
The Meshtastic devices will store incoming messages in its own queue and forward them even if no terminal device is connected to it, which means they are autonomous in that respect. When you come back into range or connect to the node again, those messages will be there to view.

This is an important point to make because it means you can place these nodes in strategic places to establish a coverage area and you do not need to connect anything to them in order for them to mesh once you configure them.
To Encrypt or Not Encrypt
Licensed amateurs can use more power on the 33cm band than the available power levels on LoRa radios. For example, if you wish to use a device which has 10 watts of power, you can, provided you are licensed. However, if you use the licensed mode of operation, then your device will ID every 10 minutes and will have encryption disabled.
The reason for the 10 watt limit for licensed amateurs is because spread spectrum modulation is limited to 10 watts. LoRa is spread spectrum.
Most of these LoRa boards are a few milliwatts, perhaps around 150 at most (+22dBm). Licensed mode would not be required unless you operating a device with more than 1 watt ERP.
One thing to consider is who you will want to communicate with – all parties need to use the same encryption keys in order to exchange messages. Or, all parties have to have encryption disabled.
It is important to note that all of the “squawks” or node info that is beaconed occurs on the primary channel, which means if you do not use the same encryption key, you will not “see” those packets.
When I first set up my nodes, I disabled encryption and enabled the licensed operator mode. I saw no nodes other than mine after a week of testing.
As soon as I reset my nodes to the default mode and encryption key, “AA==“, I immediately began seeing other nodes.
Range Test Results
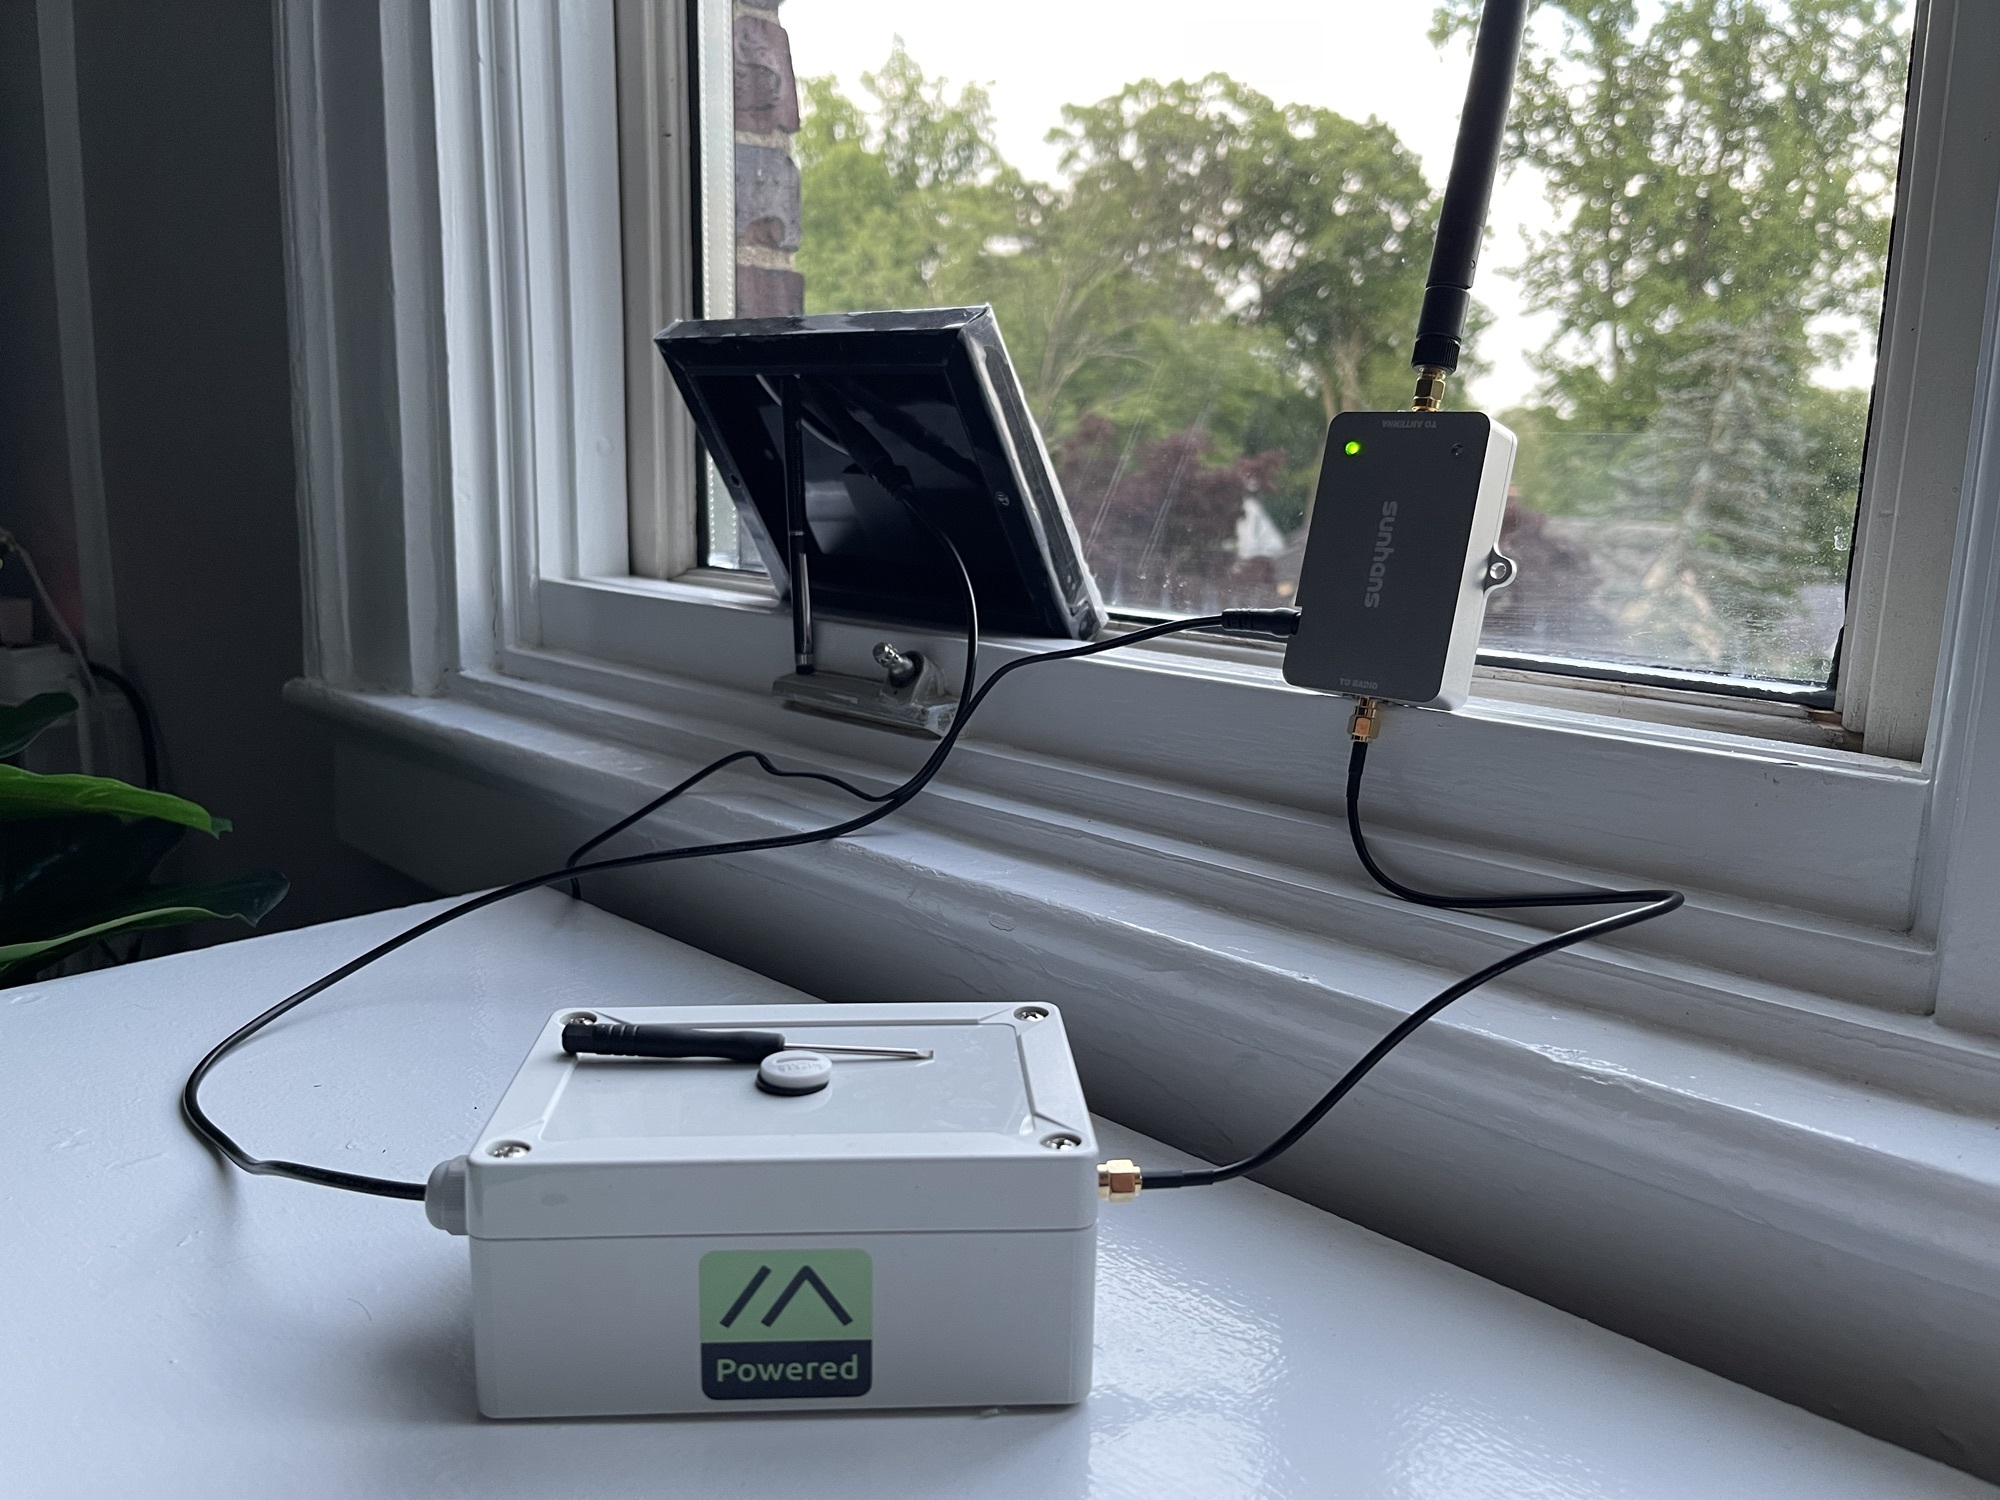
My first range test was with a RAK board which has a solar panel attached and is inside a weatherproof case. This device was premade and was ready to use when delivered.
There is a 3.7 volt 18650 battery inside the case and it is charged by a 9 volt (peak) solar panel. The RAK board has a charge controller.

I placed the device outside. Since my QTH elevation is about 325ft, I have a clear line of sight to east toward NYC.
My second node was a T-Beam, connected to a 915 MHz magnetic mount antenna in the car. I drove around and would occasionally send a direct message to the QTH node and wait for acknowledgement of the test message.
My results varied quite a bit, and were limited by objects in between my QTH node and the car. The results were surprising, given the low power output by these devices. I was able to easily get several miles away with acknowledged messages. However, direction and a clear path were critical. The QTH is on a hill and my car travels were mostly down the hill in the valley or on the other side of the valley during my testing.
Location and Privacy
These devices can beacon location. They can either be set to a fixed location or use a GPS source. Some devices have a built in GPS module. Your mobile device GPS can also be pushed to the node for its positioning source.
Enabling granular position information comes with some drawbacks, mainly privacy. You can disable location completely within the device and software, or change the location beaconing to a more general (less granular) location.
MQTT
MQTT is an IP bridge that allows nodes to be bridged over an IP network such as the internet. In my experimentation, I had this disabled. This is because I am interested in off grid communication primarily, I did not want MQTT nodes appearing, and wanted to see only direct or meshed RF devices.
Node Maps
The Meshtastic app has a map feature to visually plot all nodes you have heard. This includes nodes which are reachable indirectly via the mesh. Of course, this is limited by the number of allowable hops in each nodes settings, which is defaulted to three.

I was quite surprised by the range. My nodes are about 325 ft above sea level at the QTH which helps. Other nodes also help with coverage.
There is a web based map available, which relies on nodes enabling MQTT in order to feed the data into the pool of active node data. Even though I have MQTT disabled, others can have this enabled which forwards the nodes they hear (including mine if in range) into the MQTT database.
Puzzling One-Way Issue
After several weeks of testing and trying to send direct and primary channel messages to nodes “seen” downhill with no acknowledgment, I finally figured out what I suspected was happening.
Some nodes were running more power than these evaluation boards have by themselves. I can hear these nodes since they are running more power, but they cannot hear me. This is because I was running my boards with no power amplifier at all.
The other effect of unbalanced power is another node on the other end of the hill I am located on cannot hear my node and vice-versa. In theory, we should be able to hear each other via the node we both hear down the hill. Because that node down the hill that we both can hear, it does not hear us, and cannot relay for us.
The method I used to determine if a node “hears” me is to send a trace route request. If I receive a reply, then that node hears me. If I do not hear a reply, then that node either does not hear me or does not respond to trace route requests.
Not a single node (other than my own nodes) I heard have ever sent me a reply back to a trace route request. Me hearing them and them not hearing me is indicative of uneven transmit power levels, given the variables in play. Line of sight is there, I used multiple nodes and antenna combinations in my experiments.
Power Amplifiers
If you are a licensed operator, you can transmit up to 10 watts with LoRa on 33-cm spread spectrum. If you are not a licensed operator, your power limit is +30dBm or 1 watt.
There so happens to be quite a few amplifiers for 915 MHz available on Amazon. I use Amazon as the reference here because I have operated on the 33cm band and there are absolutely no commercial transceivers currently on the market in this band specifically for amateur radio anywhere (at the time of this post). I happened to pick up an Alinco DJ-G29 on eBay awhile back for quite a hefty price.
Finding 33cm amplifiers on Amazon is interesting because they are not marketed to amateur radio operators, but they exist because of the gaining popularity of LoRa.
To test my theory of why I was hearing nodes but they were not hearing me, I picked up a 915Mhz 1 watt amplifier on Amazon to test increased transmitting power.

There were far less expensive models on Amazon but my theory of “you get what you pay for” applies here, most likely.
This model is made with an aluminum enclosure and SMA inputs and outputs. It requires 12 VDC via a very small barrel connector on the side. It comes with a power adapter for powering from mains.
It has a variable gain control to adjust the gain given the input signal power level.
I could connect any one of my nodes to the input side of this amplifier for testing. Most importantly, the antenna I connect to the output of this amplifier would determine the level of improvement in transmitting range.
Success
With the addition of the 1 watt amplifier, I was able to get a response from a node down the hill (one suspected of also running with a power amplifier). The trace route request was acknowledged!
Mobile Testing
I put a T-Beam in the car with a mag mount designed for 915 MHz and connected the USB port for recharging. This allowed for the device to work automatically when driving around with automatic recharging of the internal battery.
I did not really see many nodes this way, unless I parked at a high elevation for awhile. I even ran the node on a 6 hour road trip and saw only a single node along the way.
Station G2
If you are looking for a node that has 1 watt or more of output power built-in, the Station G2 from B&Q Consulting can provide just over 4 watts.

The input power source can be USB-C power delivery (PD) or direct DC from 9-19 volts. This is unique from the other models mentioned because the power amplifier does not operate at the higher power output levels with a standard 5 volt USB supply.
I ended up mounting this node directly onto a 33-cm vertical antenna in the attic.

I used a 5 pin power connector wired to a control line which is fed 13.8 VDC from the shack power source. The power source is either from mains or battery & solar if needed, and can be switched.
I found that there was in fact some attenuation of signals received in the attic versus the same node by an upstairs window, with the same antenna.
Monitoring and Diagnostics
Since the web interface and mobile apps are “plug and play” with respect to how they connect with a Meshtastic node, they are not (yet) geared toward diagnostic use. For example, how do I see which node(s) acknowledged my message, if sent either to a direct node or on a channel?
Until the official app(s) and web interface support more diagnostic modes or interfaces, MeshSense from Affirmatech might be something useful for such a purpose.

Another diagnostic tool is the Meshtastic CLI (command line interface). This can be used for configuration as well as monitoring the mesh network in ways that the visual tools do not provide for (yet).
Measurements
With either the command line interface, mesh logs, or MeshSense, if you can log and view RSSI, SNR, and “hops” on each received packet, you can start to measure performance. For example, if testing two different antennas, and there is at least one node you can hear directly (0 hops), you can compare both antennas by looking at the RSSI (Received Signal Strength Indicator). The higher the number, the stronger the received signal is.
Of course, with regular amateur transceivers, we are used to seeing signal strength via the built-in visual metering system on the transceiver. This can be difficult to visualize in the moment when receiving short bursts of signals, such as LoRa. However, this information can be read from the Semtech SoC, which is then available in Meshtastic packet logs.
Node count by itself is not a measure of the performance of your receive capability. For example, some nodes are not directly received by your node, but rather “echoed” by other node(s). To compare nodes received between two antennas, two devices, or two locations (an A/B comparison), look to the number of nodes received directly, with no hops. Further, look only for permanent nodes, not portable or temporary nodes. In other words, do the comparison at the same time, or as close in time as possible.
Experience is Needed for Emergency Situations
Like any tool or service, including radio, experience is needed in order for that tool or service to be effective in an emergency situation.
The most obvious concern for a mesh is that it not rely on infrastructure from the grid. This may seem obvious to those who have such experience, and Meshtastic does not require any form of licensing, nor does it take much technical background to get started.
For example, many may not even know that they have MQTT enabled and might not realize that feature requires a network or the internet. This of course may not work in many emergency situations.
Experience is needed in order to adjust settings according to needs for a particular situation. For example, in an emergency, if Meshtastic were to be used in a crowded environment (many nodes and traffic), you might need to adjust modes (long fast, short fast, etc). You might also need to adjust the frequencies by using an offset for alternative node setups which are shifted away from the default frequencies.
You also may not have access to documentation if you need it. Perhaps a printout of documentation would be helpful, or, a reference guide. Also, you may not have access to tools or interfaces during an emergency, such as a PC, wifi network, Bluetooth devices, or anything else needed to program, adjust, or use a Meshtastic node.
Even though a solar node will work perfectly well when solar recharging is plentiful, if usage is high at night, or, there are many less than ideal daylight days in a row, you might need more battery capacity.
Store and forward methods might be extremely useful in emergencies, allowing for information to be propagated when nodes pass within range or when pathways between nodes become available.
If relying on encrypted communications, plan for methods of key exchanges, pre-shared keys, backup or secondary shared keys, planned or adhoc usage of specific channels for specific purposes, and other strategies for keeping communications open and available when needed.
Meshtastic is not necessarily the most ideal technology for emergencies, as its range, without store and forward, without continuous coverage across wide areas, it is quite localized.
Other methods of communication will be needed to bridge the gap, or expand to greater distances, such as packet over HF for example.
As an example of experience with respect to HF, having a General class (or Extra class) amateur radio license and an HF transceiver is not going to guarantee successful communication in an emergency situation. Experience from learning by actually doing is where the real world applicable knowledge will be gained.
For example, what band(s) are most likely to be best at a given time, what type of antenna to build and use, what mode(s) are best for a particular purpose.
Downsides of a Mesh
While a mesh sounds like an advantageous method of extending a relatively short distance communication mode, it has some inherent limitations.
First, all nodes must have the same or compatible RF and packet parameters in order to participate in the mesh. One node cannot be on a different preset mode such as short fast while other nodes are set to long fast.
Another potential issue is if one or more nodes censor or otherwise block a node or nodes from being repeated by their node. This could be either to improve the network to address a specific issue, or, the a result of a disagreement or censorship.
A mesh seems like a great way to extend a network, but, the downside is it does rely on other nodes in order to work. The more nodes it relies on, the higher the probability of it not working when needed. Unless those other nodes are under your control, you are limited to relying on others to cooperate and keep their nodes online with compatible settings with your node(s).
Final Thoughts
Meshtastic is a great platform using LoRa for off-grid texting. This can be helpful recreationally as well as during outages or when out of range of cellular communication.
Since it does not need any grid resources, it would work quite well for neighborhood communication or for even larger areas if internet or cell coverage were ever to be shut down or during an outage.
Because it supports encryption, an added layer of privacy allows it to be used to communicate without needing to be concerned that others can read your texts.
Assuming the ISM designation is not revoked for the 915 MHz band and these devices in the future, these are great for non-licensed users to use and become active with. And, for those who are licensed amateurs, if the designation is ever revoked, assuming 33cm remains within the amateur radio privileges, amateurs can continue to use the platform, without encryption of course.
Even though there are a few bugs here and there, these will likely get fixed and more features are likely to be added over time.