
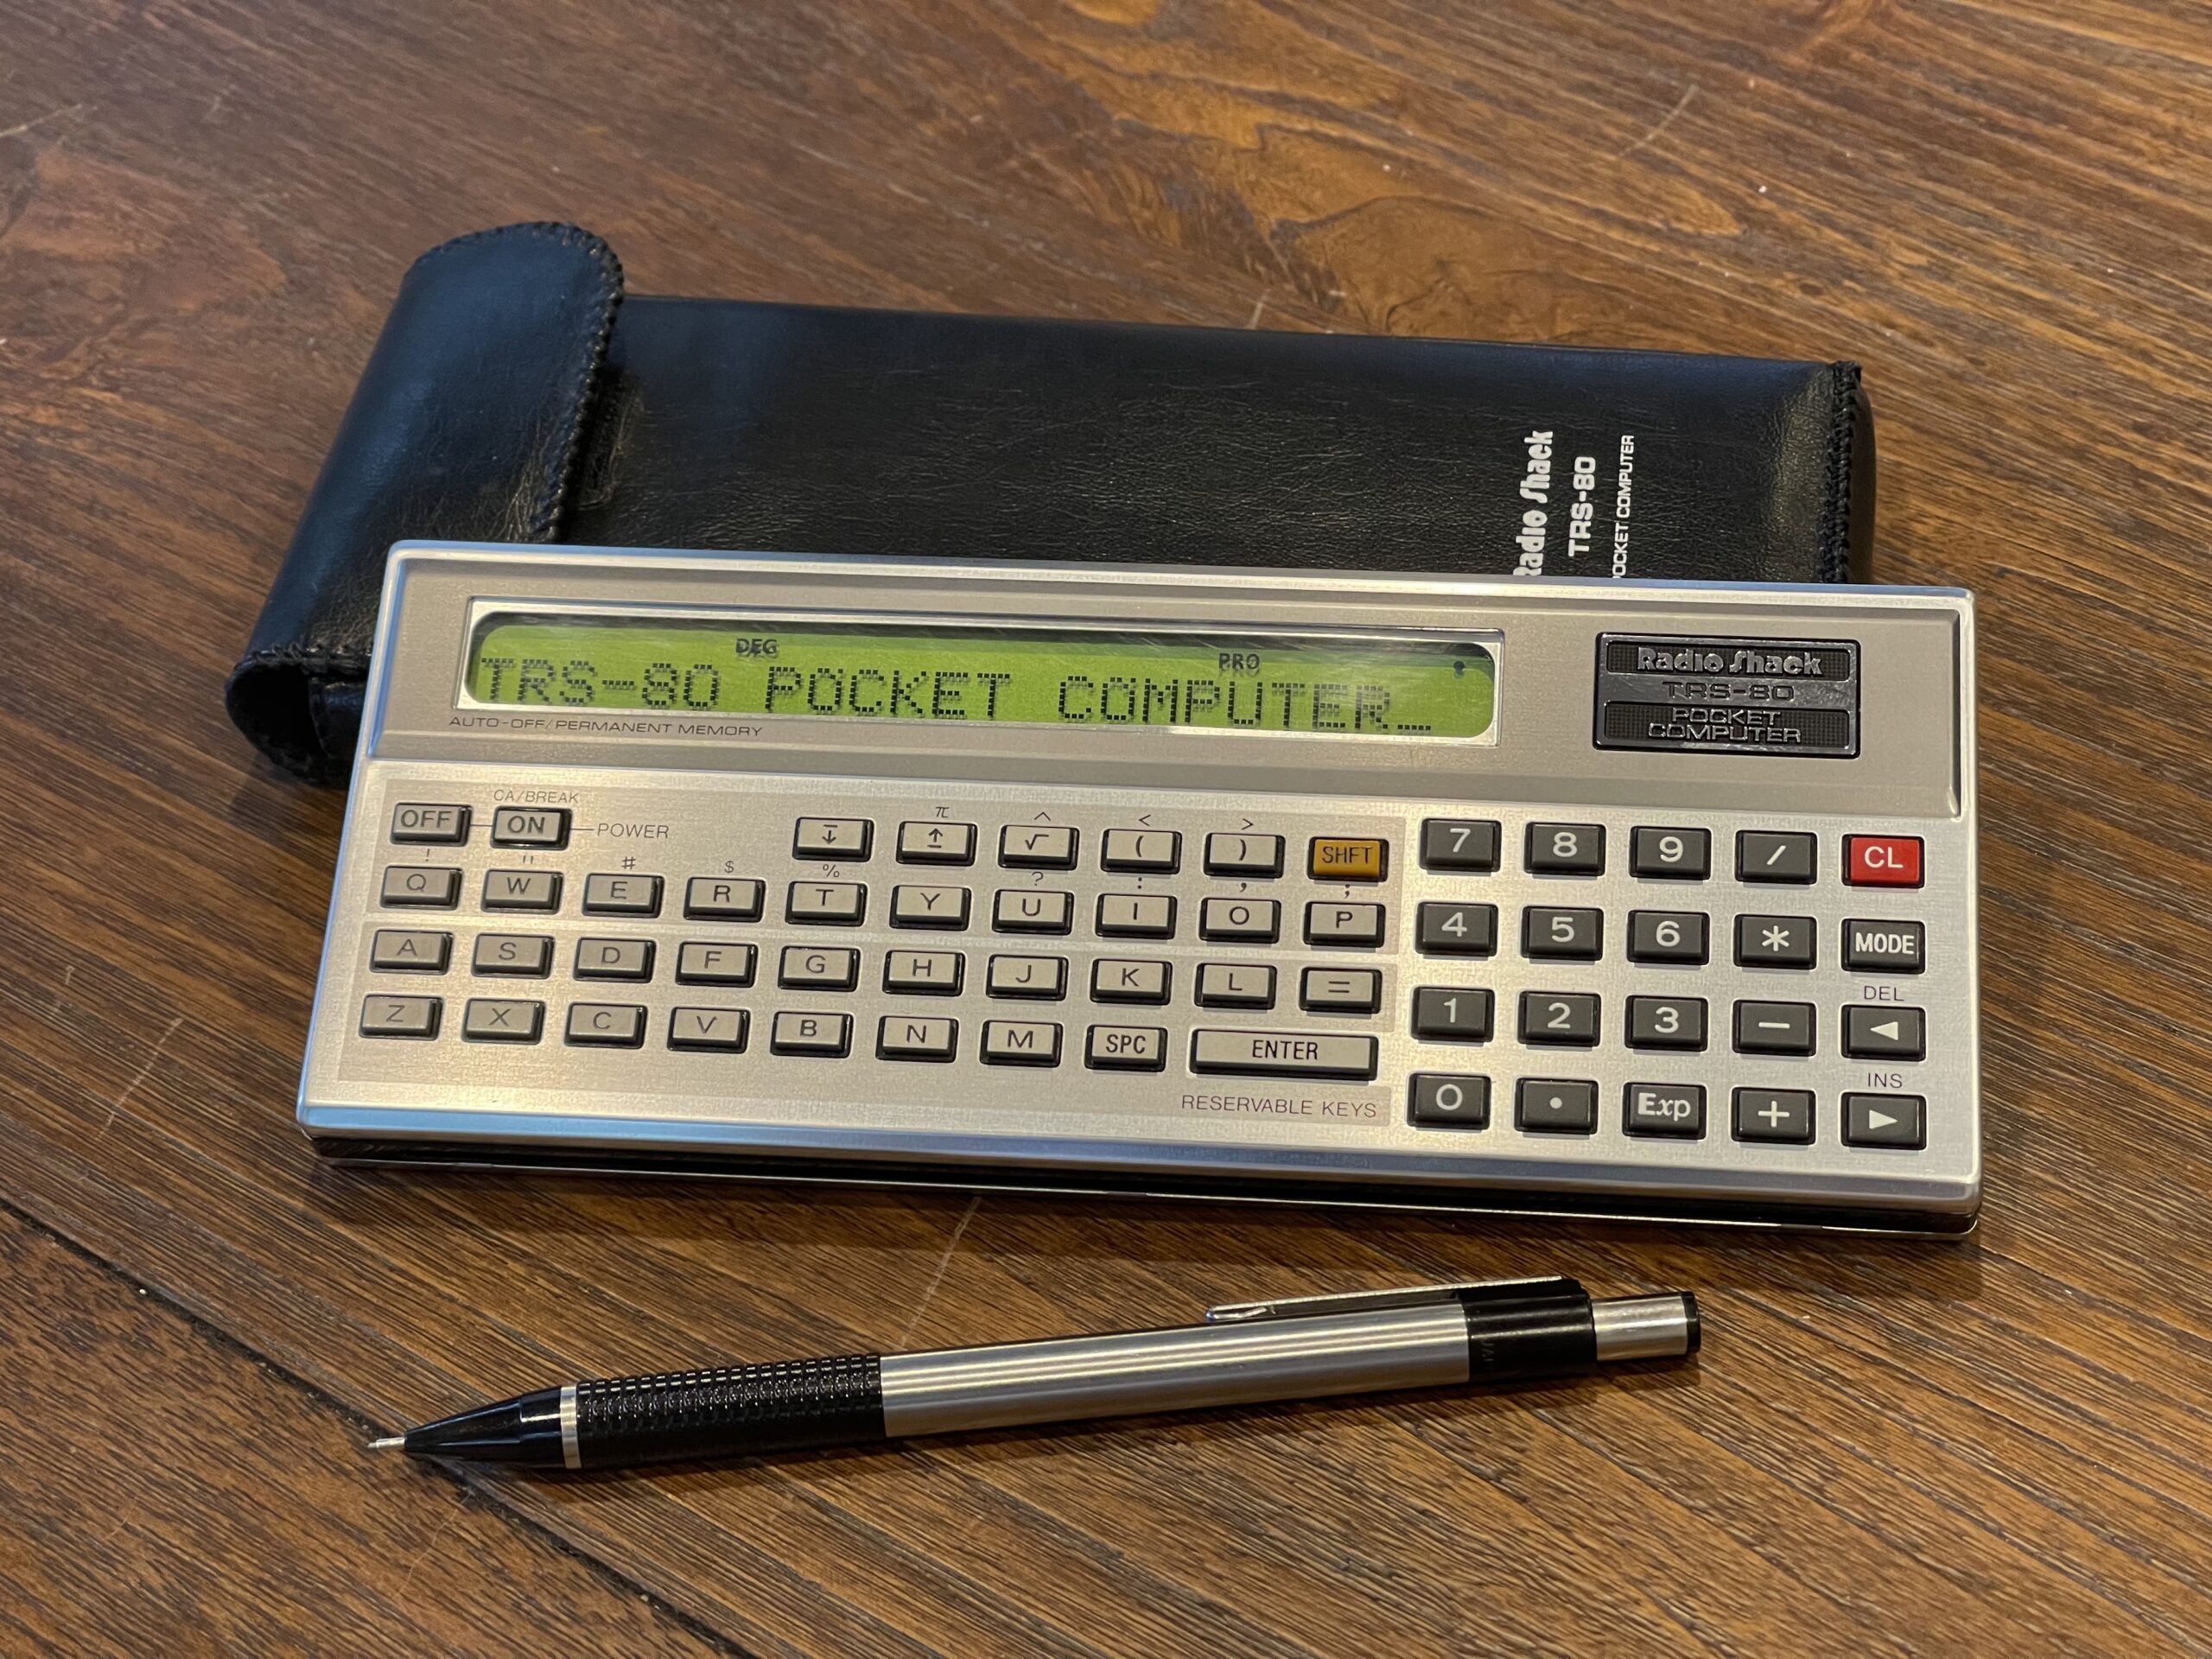
TRS-80 PC-1 Pocket Computer
Recently I have been curious about the TRS-80 Pocket Computer (the PC-1), the first pocket computer Radio Shack sold. It was first announced to the market in 1980, and added in the 1981 Radio Shack catalog (without the PC-1 designation) for $249.00. It was available through catalog year 1983. It sold for 3 years, until the PC-2, introduced in 1983 had replaced it.
Radio Shack Pocket Computer Releases
I searched through RadioShackCatalogs.com from 1980 through 1993 to compile a timeline of pocket computer releases and catalog years when each pocket computer model was available.
- 1981 – PC-1 (new)
- 1982 – PC-1
- 1983 – PC-1, PC-2 (new)
- 1984 – PC-2, PC-3 (new), PC-4 (new)
- 1985 – PC-3a, PC-4
- 1986 – PC-3a, PC-4b, PC-5 (new)
- 1987 – PC-6 (new), PC-7 (new)
- 1988 – PC-6, PC-7, PC-8 (new)
- 1989 – PC-6, PC-7
- 1990 – PC-6
- 1991 – PC-6
- 1992 – PC-6

The PC-1 was a rebadged Sharp PC-1211. It was advertised as having 1.9 KB of RAM. It has a 24 character LCD and a peripheral port for a printer and/or cassette interface. It has a buzzer, although duration and tone are not adjustable. It has no options for expanding the RAM.

The $249 price tag was very expensive for a programmable calculator, but this was one of the first pocket computers sold in the United States. Sharp had released the PC-1211 in in Japan and other areas outside of the United States. Radio Shack brought this breakthrough device to the United States by rebadging it as the TRS-80 Pocket Computer.
The breakthrough for 1980 was the pocket sized form factor and the ability to write programs in BASIC. Although pocket computers would become far more popular in Japan, programs for specialized uses such as loans, HVAC, automotive, sports, surveying, and more were released using various successors to this pocket computer model. Even today (at the time this post was written), these customized units pop up on eBay from time to time.
This would be the first of many pocket computers Radio Shack would sell over the nearly decade long run of the product line. Of course, once the next model was released, this model became known as the PC-1.
There were some discounts to be had once the next model was released, the PC-2.

Radio Shack sold software titles for the PC-1 in the form of cassette tapes. They did so only for the PC-1, and ended with the PC-2. There was some software that was available for the PC-3 for special order.

Until now, I had not pursued picking up a PC-1, mainly because every model I would see on eBay and on other auction sites had a bad LCD. Over time, almost every one of the PC-1’s would eventually have fairly bad LCD leakage, rendering the device inoperable.
I saw a video from Robert Baruch showing a replacement procedure for the LCD on a PC-1. Robert posted a link to purchase the replacement LCDs in the comments section for the video.
After watching the video, I figured this type of project would be an interesting and somewhat challenging experience. If I could find a decent condition PC-1, I could give it a go and if it works, I would be able to experiment with the first model in a long line of those that followed. I placed an order for an LCD from Robert.
Manuals
The PC-1 owners manual is below:
The PC-1 service manual is below, which includes the cassette interface:
PC-1 Found
I was browsing the postings on various auction sites for a PC-1 in decent condition (minus the LCD of course). I found one in excellent condition with the case, printer, printer case, and manual. Of course, the LCD went bad, but this was expected.

The seller of this unit included the original sales receipt for the purchase from Radio Shack. It had been purchased on January 21, 1982 in Garden Grove, California. The PC-1 was $169.95, the printer was $129.95, and the printer case was $14.95. The buyer must have purchased this during a sale, because in 1982 it was listed for $229.95 and the printer was listed for $149.95.
The unit and accessories do not look like they were used very much. That or it was well cared for.


At the time of the release of the PC-1, several books were published which included sample programs. At the time, the ability to write programs in BASIC on a calculator that is portable was a new concept to many. These guides no doubt helped the non-tech savvy to be able to use these computers for business and/or school.


Batteries
When it arrived, I took the cover off the back of the PC-1 to check the state of the battery compartment.


The inside was as clean as the outside. No trace of leaking batteries was present. However, the computer came with LR44 batteries, which are not the correct type. LR44 batteries are 1.5 volts each, which provides a total of 6 volts (since this computer takes 4 batteries).
The owners manual notes the battery type is 675 (mercury) batteries. The mercury batteries would have likely been 1.35 volts each, for a total of 5.4 volts. Since these are no longer available, the equivalent would be zinc air, which are 1.45 volts each, for a total of 5.8 volts. The PC-1 is rated at 5.4 volts (on the back cover).
Luckily no permanent damage appears to have been done with the 6 volts supplied by the batteries that came inside the PC-1 when I obtained it. The zinc air batteries are common and inexpensive. Today these are used in hearing aids, so they’ll likely be around for a few more decades.
There is a simple modification using diodes to reduce the voltage which can be done if you wish to use alkaline LR44 batteries instead of zinc air batteries. If I find these batteries to die off quickly, I will likely perform the modification and switch to alkaline batteries.
Update – Diode Modification
After using the PC-1 for a bit, I noticed the zinc air batteries do not last long and they die off whether you use them or not. This makes sense, as the reaction with air is what produces the voltage from the battery. Once that reaction is complete, the battery is dead.
I used a 1N4148 diode which has a forward voltage drop of about 0.7 volts, and can handle up to about 300mA of current. If using 4 LR44 batteries, the voltage supplied would be 6 volts total (1.5 volts each). Adding the diode in series would drop the 6 volts down to 5.3 volts, closer to the rating of 5.4 volts specified on the back cover.
The modification was simple. I placed the diode on the positive side of the battery connection by cutting the existing supply wire (red) and adding the diode in series. I used some red heat shrink over the diode connection for protection and strengthening of the modification.


PC-1 Size
The PC-1 is quite a bit smaller than the PC-2, which I immediately noticed. They could not fit “AA” or “AAA” batteries in the PC-1. The PC-2 for comparison takes 4 “AA” batteries, but it is significantly larger.


The PC-1 is closest in size to the PC-4:

Replacing the LCD
Since I already had the replacement LCD, I was able to start replacing it as soon as I got the PC-1. The video was a great guide for the replacement process. I do not intend to rehash the steps in the video. Instead, I have taken some notes along the way that I will share.
First, removing the PCB “sandwich” from the case was far easier than I thought it would be. The only difficulty was removing the battery terminals from the plastic case. This was simple, but not having done it before, I was careful not to break anything.
I would highly recommend a magnetized screw driver. There are 6 screws which must be placed into the lower PCB through the upper PCB. Dropping one of these screws inside the PC-1 is not fun.
Removing the old LCD bezel was easier than I thought. However, its worth noting that a “miss” or slip of the screw driver or tiny pliers can ruin the project. This can scratch and damage the traces on the PCB.
I soaked the LCD and bezel assembly in acetone overnight, for about 14 hours. The LCD backing had separated and it was a bit messy when it came out of the solution:


However, it basically fell out of the bezel, which was better than having to pry it out. I did spend quite a bit of time cleaning the adhesive residue off the inside of the bezel. I ended up soaking it again in acetone while scraping off the excess adhesive with a spudger. I was very careful not to bend the bezel.
Cleaning the new LCD and old zebra strips with IPA and applying them to the replacement LCD was quite simple. Even placing the bezel back onto the PCB was easy. Again, care must be taken when applying pressure to the frame against the PCB while closing the “nubs” from the bezel. One slip of the pliers can ruin the PCB or cause hours of work.
I ended up removing the little paper wedge holding the LCD in place as I aligned the bezel onto the PCB and applied a bit of pressure on the other end. I used a tweezers to sneak it out of there before closing it up all the way against the PCB.
Testing
Before putting everything back together, I chose to test out the new LCD. Because the new LCD has the polarizer built in, I will be able to see the display. I have a variable power supply, which I set to about 5.25 volts and connected it to the battery leads on the PCB. It was a success!

My first attempt was successful – no missing pixels and no lines. The contrast was perfect at this voltage. However, the actual voltage when using the zinc air batteries will be 5.8 volts. At 5.8 volts, the level for contrast was too dark:

There is a contrast potentiometer on the PCB:

Unfortunately, this potentiometer had a bit of glue keeping it from moving easily. I ended up simply lifting up the wiper enough so that it no longer made contact with the resistive element. This ended up being the perfect resistance value for the LCD contrast level for the new display.
Rogue Adhesive
The only difficult part of the project was the plastic LCD cover assembly. It has the plastic which covers the LCD window, a metal strip for the “outline” of the window, and the polarizer. These are held together with a single strip of adhesive. I was very careful to remove the polarizer which is required, since the new LCD has one already.
Somehow some adhesive or residue ended up between the metal strip for the window outline and the protective plastic. In trying to remove it with IPA, it made it worse. I ended up having to clean it all up with a plastic polish and IPA. As careful as I was to not bend the thin metal strip for the window outline, there is a small slight bend in mine.
The result was a success! The new LCD looks great and everything appears to function correctly.

Odd Zero versus “O”
One thing that is a bit odd for this model is the letter “O”, versus the number zero, “0”. On every other pocket computer model I have seen, the zero usually has the slash through it in order to distinguish between a zero and the letter “O”. On the PC-1, the letter “O” has an odd dent and nub off the top right corner:

At first I thought there was a problem with the LCD or I had broken a trace somewhere, but this occured in all 24 positions on the LCD. It turns out this is how the PC-1 displays the letter “O”.
Battery Leakage
The most common issue I have seen, besides the LCD leakage, is battery leakage. Battery leakage is most prevalent with AAA or larger batteries, but it can also happen with older button cell type batteries.
Batteries are almost always left in vintage calculators and pocket computers. Although it is unusual for an alkaline button cell to leak, the older ones (such as mercury based batteries) seem to me more susceptible to leaking if left in the unit for 40 years or so.
Many of these PC-1s have visible signs of battery leakage. The battery compartment is directly under the “badge” on the PC-1. If the batteries leak, the leakage can be seen right around the badge, as shown below:

Unfortunately this cosmetic damage is not fixable. If you see this on a unit, you can be sure that the screws on the upper left side of the back of the pocket computer are rusted in place. They will easily snap when attempting to remove the back cover. The unit will then not have a screw or two to hold the back cover on.
The leakage on the inside in the battery compartment is easy to clean up with something acidic such as vinegar or citric acid.
Luckily I found a unit that someone had replaced the mercury based batteries with newer alkaline batteries, which had not leaked (yet).
Printer Cassette Interface
The PC-1 I found on eBay came with the printer cassette interface unit. The printer uses 45mm paper and prints up to 16 columns per line. The printer is a pin/mechanical dot matrix printer, which is unique among the Radio Shack pocket computer line. This was the first and last pin/mechanical printer for a Radio Shack pocket computer.. The PC-2 used ball point pens, and the PC-3 and PC-4 were thermal.
The paper can still be found on Amazon, although 1mm narrower, 44mm, or 1 3/4″. The Epson ERC-05B replacement ribbon works with this printer. I found that these are fairly inexpensive and readily available.

Like all of these printers, the internal NiCd battery pack needed replacement.

There was some corrosion around the batteries themselves, some corrosion on the battery leads & wires, and some liquid on the top and bottom of the case.
The NiCd cells are listed as 1.25 volts, whereas the NiMH cells I use for replacements are 1.2 volts. I really do not recall ever seeing 1.25 volt NiCd batteries, I had always thought they were 1.2 volts. I checked a Radio Shack catalog from 1985 just to compare. They are also listed at 1.25 volts.

I replaced the pack with NiMH cells, soldered in new leads and connected everything as it should be.

The pack was not fully charged, so I had to charge it for a few hours in order to test the printer. The low battery light did flash when I turned the unit on.
Missing AC Adapter
There was no AC adapter in the box when the item arrived, and nothing mentioned in the user guide regarding the polarity and voltage requirements for the adapter. The only related item in the user guide was that the operating voltage was 4.8 volts, which is the same rating stamped on the bottom of the case. I found a reference to the Sharp equivalent of this printer and cassette interface, the CE-122, which uses a Sharp EA-11E AC adapter. Pictures available on the world wide web show center negative at 6 volts DC. The Model 100 AC adapter is 6 volts center pin negative. I used that to charge up the new battery pack.
After charging for a few hours, I noticed the low battery light was still flashing on occasion when turning the power on. I also noticed the line feed was not working. I took the printer apart again to verify the new battery leads were making a connection and power was getting over to the top PCB where the computer bus connection is. I added some food grade silicone gel to the printer assembly, specifically the gear that moves the print head.
After a few more on/off cycles, finally the printer came to life! It seems the printer mechanism might have seized at some point and finally was able to move.
Working Printer
I used a tiny bit of WD-40 on the printer ribbon (an old trick from the 80s) using a cotton swab, turned the advance on the ribbon a few complete loops, and loaded paper. I wrote a quick test program to echo input from the keyboard, and it worked!
10 INPUT "TEXT?",A$
20 PRINT A$
30 GOTO 10
PC-1 Printer Test Printout
I was amazed the ribbon had a little bit of ink left in it, enough to print. The ribbon and paper are likely original to the printer from 1982.
Note the letter “O” has that odd look, just like the LCD font:

Using the printer on this model is a bit unique compared to all of the other models. It will only print from a PRINT or LIST statement. It cannot echo what is on the screen, such as when using “calculator mode”, like the Casio line can. In order to activate the printer, it must be turned on first, then the computer turned on, then press “On” again on the calculator after a few seconds. Then there is a print on/off switch on the printer itself. If this is on, then all PRINT and LIST statements will output to the printer.
Cassette Interface
I tested the cassette interface by saving my test program (above) and then clearing the memory, and loading the test program. The interface worked perfectly.
The cassette interface is an important accessory for these pocket computers. At the time, there was no battery backup, and if you had to change the batteries in the pocket computer, the program would be lost. Having a cassette interface allows saving and loading of programs to and from ordinary cassettes. Even though Radio Shack sold the minisette recorder marketed for computer use, any cassette recorder with a headphone and microphone jack would work perfectly well with these pocket computers.
Multiple programs could be written and loaded via cassette, and Radio Shack sold a few software titles which were distributed on cassette. The PC-1 printer had the cassette interface, and Radio Shack also sold a stand-alone cassette interface (without the printer) for the PC-1.

Functional Overview
The PC-1, being a rebadged Sharp pocket computer, does not have segmented program areas like the Casio models (P0-P9). However, you can assign programs to start in “reserve mode” by assigning keys to run specific program statements or start running at a specific line number. If you wanted to store multiple programs in memory at the same time, you could simply use line numbers which do not overlap across each program.
This pocket computer is unique in the way it indicates the amount of free memory remaining. It indicates program “steps” and equivalent “memories” available:

In the example above, after a full reset of the PC-1, the MEM command shows 1,424 steps or 178 memories available. This equates to 1,424 bytes available.
There are 26 memories (variables A-Z, or A$-Z$) built in and pre-allocated. The PC-1 has “flexible memory” meaning the program steps and variable allocation beyond the built in 26 variables share the same space. There is no need to use DIM or DEFM statements to allocate variable storage. Each program line consumes “steps” (or bytes) from the available steps listed.
The “memories” number shown is simply an equivalent measure of how many 8-byte (or 8 “step”) variables you can use beyond the 26 preallocated variables. For example, if have any “memories” available, you can assign values to variables A(27) or A$(27) or higher. In the example above, I have 138 “memories” available, which means I can assign values up to A(164) or A$(164). Assigning anything to A(165) or A$(165) or higher will result in an error 4.
Also, adding new program lines or editing program lines which consume more “steps” will reduce the number of available “memories”. Editing program lines or removing program lines will add to the number of available “memories”, but the contents of those spaces are unpredictable if they were previously used.
For example, I assigned a value of 1 to A(164), and then added a new program line. If I then try to read A(164), an error 4 occurs. I then deleted the new program line, and read A(164) and a value of 1.000002121 was returned.
Banner Program
My banner program bas become the baseline for learning the BASIC variant for a particular pocket computer and what it’s capabilities are. Each pocket computer has different levels of capability usually tied to memory and BASIC commands available. The PC-1 was the first pocket computer released within the Radio Shack line of pocket computers. It has a very limited BASIC command set compared to most of the other models.
In order for the banner program to work on a particular pocket computer model, a few conditions need to be met. There needs to be enough memory to store the font bitmap data and the banner program. Alternatively, if the pocket computer supports reading of it’s ROM image, the font bitmap data can be read directly from ROM.
The PC-1 does not support the DATA statement, therefore storing the bitmap data will need to be done another way. Since the PC-1 supports a method to save the variable contents to tape, I can store the bitmap in the flexible memory space. Then, I can save the variable space to tape. This avoids having to manually enter the font bitmap data in order to use the banner program.
Building the Font Data
For this version of the banner program, I started with the font bitmap data that I created for the PC-8. However, some modifications were needed for this version.
In the example below, I take the bitmap for the letter “Z” and transpose it in it’s printed form. Note that dashes are used instead of spaces for illustration purposes. Also note that the font bitmap will be expanded by a factor of 2 horizontally when printed. For example, each zero will be two spaces, each one will be two X’s:
BYTE 1: 01100001
BYTE 2: 01010001
BYTE 3: 01001001
BYTE 4: 01000101
BYTE 5: 01000011
Desired Output:
--XXXX--------XX  Direction
--XX--XX------XX      |
--XX----XX----XX      |
--XX------XX--XX      |
--XX--------XXXX     \|/
Because the font is 7 pixels wide, the 8th bit is always zero. Each character needs 5 rows of data. These five bytes above can be represented in decimal form as 97, 81, 73, 69, 67.
All of my previous banner program versions use the same bitmap font data format. However, due to the method I need to use on the PC-1, I need to flip the bitmap data. For example, since there is no bitwise AND function for the PC-1, I need to inspect the lowest order bit first, then right shift, and repeat. In other versions of the banner program, I was able to read the bits from left to right. In this version, I can only read them right to left. This results in the “Z” being printed mirrored:
Actual Output:
XX--------XXXX--  Direction
XX------XX--XX--      |
XX----XX----XX--      |
XX--XX------XX--      |
XXXX--------XX--     \|/
I took the font bitmap data from my previous versions of the banner program and mirrored the bits:
BYTE 1: 01000011
BYTE 2: 01000101
BYTE 3: 01001001
BYTE 4: 01010001
BYTE 5: 01100001
The decimal form for each of these bytes would be 67, 69, 73, 81, 97. I did the same “mirroring” for all of the characters A – Z and 0 – 9. This way the output to the printer is now in the correct order. Now that I have the format of the font bitmap data needed, I need a way to store this into the PC-1 without the use of DATA statements.
Using Less Memory for the Font Data
The font bitmap data in the format I created is 7 bits per row (round up to a byte, 8 bits), and 5 rows per character. There is a total of 37 characters, or 185 bytes. This includes the characters A – Z, a space, then the characters 0 – 9. With only 1.9 KB of memory for the program and variables, I could not possibly use the same format I used for the PC-8 and store the font data similarly.
The PC-1 uses 8 bytes per variable, the same amount for strings or integer values. It already allocates A – Z (or A$ – Z$) and this memory is separate from the program memory. These variables represent available memory. If I use this memory to store the font bitmap data, then I would only need to borrow a little bit more from the program memory for the rest of the bitmap data.
However, I do not have enough memory to store each row of bitmap data (185 rows) into variables by using one variable per row. Instead, I need to use more than a byte’s worth per variable space. By packing more bytes into each variable, I am able to use more of the 8 bytes per variable, and pack more into the same space.
My approach is to pack 4 bytes (or 4 rows of font data) into each variable location. The font data for each character has 5 bytes, one for each row in the character. This requires a total of only 47 variable locations to store all characters from A – Z, the space character, and 0 – 9, which includes 5 rows of 7 bits per character.

For example, the numbers highlighted above (the left column) represent the 5 bytes for the letter “Z”. The data is read by the program from top to bottom, right to left. This means, the data would be read as 97, 81, 73, 69, 67. Notice how the last two bytes in the sequence for the letter “Z” are on the next line, and the first three bytes start in the middle of the row.
The column of numbers on the right is simply the result of “packing” the four values on the left into a single value. For example, if I assign a letter from A to D (from left to right) on each of the four bytes, I can describe the packing as a series of left shifts, using the following example:
(A * 128 * 128 * 128) + (B * 128 * 128) + (C * 128) + DBecause the font bitmap data never uses the 8th bit (it’s only 7 bits wide), I left shift by 7 bits each time, or by the value of 128. This avoids too large of a number which exceeds the computational limit of the pocket computer.
Note that the bytes are stored in reverse order and the bits are mirrored for each character compared to the PC-8 format. This is due to how I have to read each bit, and the limitations of the PC-1’s BASIC commands available.
The data needs to be stored in the above format for the characters A – Z, a space, and 0 – 9. This method consumes only 47 variable locations, or 376 bytes of memory.
Using Less Memory for the Font Data
I wrote a program which inputs the font bitmap data into a variable array, leaving some room at the beginning of that array for working variables for the banner program:
400 FOR I = 53 TO 99 : INPUT A(I) : NEXT II then ran the program above and typed in the following numbers:
76616223
155181215
137337673
136880321
131096831
154297599
152190913
137338952
267625665
266470408
138403968
136331520
18866303
267407636
2113665
67506303
17055743
137346948
267362497
101852232
139550910
160579517
153917642
134849737
135282624
2113790
6502526
6276720
209699084
207946772
33802336
154231264
12497
130023424
131359941
4182144
145805440
154163401
26326233
10474004
171206898
153767758
135267145
114829391
114451657
156394672
60
The data above is the “packed” bytes of font bitmap data, in the order of A – Z, a space, then 0 – 9.
After entering the bitmap data manually, I saved the variables to tape, so they do not need to be manually entered:
PRINT#"MEM"Reading the Font Data
The banner program needs to have a method to read each row of font data and examine each bit in the row. There also needs to be a method to either print characters multiple times to the same row on the printer (without an automatic line feed), or a way to perform string concatenation. The PC-1 does not support string concatenation.
Similar to the PC-6, I cannot use bitwise AND or other logic to examine each bit in each row of font data. However, I was able to use the same method to determine if the lowest order bit is a zero or one based on even or odd value of the variable. I then used division to “right shift” the value to examine the next bit and so on.
The PC-1 does not support any string inspection commands, such as MID or LEN. Therefore, I am unable to print a banner from a single input of a string from the user. Each character needs to be entered one at a time.
The PC-1 has no method to convert a character to an integer, nor can I easily mix a character and integer within a contiguous section of an array like I did with the PC-6 banner program. Therefore, I cannot easily index the font data given character inputs from the user. Instead, I used 37 more variable locations to store the letters A – Z, a space, and numbers 0 – 9. In the program, I simply use this array to convert a character to an index.
I loaded the characters into the variable space using the following program:
500 FOR I = 16 TO 52 : INPUT A$(I) : NEXT ISince I have two arrays of data (font bitmap and character index), I saved these to tape, so they do not need to be manually entered:
PRINT#"MEM"This data can then be loaded again if needed, using:
INPUT#"MEM"Now that I found a method to store the font bitmap data and character index data with limited BASIC support and limited memory, I then began to solve for the retrieval of the font data given the user character input.
I used the following code to get an index based on user character input:
10 INPUT "LETTER?",H$ : N = 15
20 N = N + 1 : IF H$ = A$(N) THEN 40
30 GOTO 20
The variable N contains the index value for the character input.
Next, since I am packing 4 bytes into each variable location, this adds a bit of complexity for getting to the first bit in the character to be printed. This is because each character of font bitmap data needs 5 rows, I am storing 4 rows per variable location.
Since N points to the character index to be printed, this needs to be converted to the variable index (from 53 to 98) for where those bits are stored. Since there are 4 rows of font data per variable location in the array, and each character has 5 rows of font data, the conversion is fairly simple. Lines 40 and 50 below perform this conversion:
40 N = N - 16 : N = N * 5 / 4 + 53
50 O = (N - INT N) * 4 : N = INT N : J = A(N) : O = O * 7 : IF O = 0 THEN 90
60 FOR K = O TO 1 STEP -1
70 GOSUB 300
80 NEXT K
90 O = 28 - O
Since the first row of font data might not align with the first bit in the variable location, the variable O above is used to calculate where our starting bit actually is for the first row of font data. This is done by taking the fraction part (or remainder) of N and converting the result to the number of bits we need to right shift by (throw away or skip over).
On line 90, I am re-using the variable O to keep track of how many bits are remaining in this variable location before we have to load the next location to continue printing the rest of the current character.
With the storage and retrieval of the font bitmap data solved for, I then focused on the printing of each row.
The PC-1 does not support string concatenation, and the printer has an automatic line feed after each print command. Therefore, I used the print command with multiple arguments:
170 PRINT A$;B$;C$;D$;E$;F$;G$The printer supports 16 characters per line. With a font width of 7 pixels, a multiplication factor of 2 works well for the printout.
Working Banner Program
As it turns out, with the workarounds described above, I was able to write a version of my banner program for the PC-1. The user needs to enter the characters one at a time. This is due to the method I needed to use to read and decode the font data given the limitations of BASIC on this model.


The PC-1 is quite slow to print compared to all other pocket computer models.
At the end of this article I posted instructions and WAV files to load into a PC-1 for the banner program.
Commercial Software for the PC-1
Radio Shack published and sold quite a few programs for the PC-1, distributed in cassette form. Some of these are available online these days as WAV or MP3 for download. There are also many books available online with program samples in them. Shortly after writing my banner program, I saw a listing on eBay for a PC-1 with printer. The listing had a banner printed out in the photograph. After a short message exchange, the seller pointed me to a “Banner” program that was released by Radio Shack.

The program takes letter inputs from the user and prints them out, and provides for a method to enter “codes” for lower case or special characters, as an A and B component, directly entered by the user. It also can print “horizontally” as an option. To choose between vertical and horizontal, you load the VBAN or HBAN program respectively.
I have posted WAV files as well as the PDF user guide as well for this program below (thanks to Dave Britten on HP Forums for the posting of this program):
I was curious how they stored the font data with such a small amount of RAM available. I reviewed their program listing (below) and see that they took advantage of the GOSUB operator with a variable parameter (line 3). I did not realize (until now) that this was possible on the PC-1.
1 PAUSE "BANNER-H": PAUSE "(C) 81 TANDY":M=16:D=128
2 INPUT "LETTER? ";A$(M):M=M+1: IF M<30 THEN 2
3 FOR N=16 TO M-1: GOSUB A$(N):O=1
...
21 "E"A=1205503:B=8393: RETURN
22 "A"A=1184799:B=4008: RETURN
Each character has its subroutine for setting the A and B value (the font bitmap data), with the character itself as the label for the subroutine.
The Tandy HBAN program, after loading, leaves 24 steps or 3 memories available. This means the Tandy version of the horizontal banner application consumes 1,400 bytes of memory. This is quite a bit more memory than my version requires.

You can still find quite a bit of the commercial software on archive.org, including relevant books for the PC-1:
https://archive.org/search?query=TRS-80+Pocket+computer
I have written a version of the banner program for every model that I have experimented with, each with varying degrees of memory usage and methods. For most models with enough memory, I have also written maze generators. If I had these units back in the 80s, perhaps I could pitch the maze idea to Tandy, and they might have released my maze program:

Unfortunately, the PC-1 does not have enough memory nor a random number generator necessary for a good maze generator program.
Final Thoughts
I am glad I got the opportunity to experiment with the PC-1, the first model of the pocket computer line from Radio Shack and the first available in the United States. Replacing the LCD went better than I expected, and the printer worked! Thanks to Robert Baruch for providing replacement LCDs. Without his efforts, I would not have been able to get a working PC-1 to experiment with.
I was glad to be able to get a version of my banner program to work on this model. The banner program itself uses only 318 “steps”, leaving 138 “memories”. I ended up using only 72 of these available memories, leaving space for 66 more storage locations if needed. This extra space can be used for extra character bitmaps for example, if needed.
Even though my version of the program uses much less memory than the Radio Shack version of the banner program, I learned quite a bit more about the capabilities of the BASIC options on this model by reviewing their version of the program.
I found a source for ribbon replacements. The Epson ERC-05B replacement works with this printer. I found that these are fairly cheap and available. It is also possible to use WD-40 and/or stamp ink to push these ribbons a bit further.
Program Listing
I have included the PC-1 banner program as a WAV file as well as the variable storage file, if you have a PC-1 and the cassette interface:
Note that you need to load both files. The first file (banner) loads the program, and the second file (mem) loads the font bitmap data into the variable space. To load the program:
CLOAD"BANNER"To load the font bitmap data:
INPUT#"MEM"I have included the program listing below:
10 INPUT "LETTER?",H$ : N = 15
20 N = N + 1 : IF H$ = A$(N) THEN 40
30 GOTO 20
40 N = N - 16 : N = N * 5 / 4 + 53
50 O = (N - INT N) * 4 : N = INT N : J = A(N) : O = O * 7 : IF O = 0 THEN 90
60 FOR K = O TO 1 STEP -1
70 GOSUB 300
80 NEXT K
90 O = 28 - O
100 FOR M = 1 TO 5
110 FOR K = 1 TO 7
120 GOSUB 300 : IF L = J THEN 140
130 A$(K) = "XX" : GOTO 150
140 A$(K) = "  "
150 O = O - 1
160 NEXT K
170 PRINT A$;B$;C$;D$;E$;F$;G$
180 PRINT A$;B$;C$;D$;E$;F$;G$
190 IF O = 0 LET J = A(N + 1)
200 NEXT M
210 PRINT " " : PRINT " "
220 GOTO 10
300 L = J / 2 : J = INT L
310 RETURN
The variable descriptions are included below:
A$(1-7) - Print Strings
H$ - Letter input
I - Font Byte Loop
J - Font Row Value
K - Font Row Loop
L - Temp
M - Shift loop
N - Indexer to Font Bitmap
O - Bits left in font row
A$(16-52) - Characters for indexing
A(53-99) - Font bitmap
Tandy’s Banner Listing (HBAN)
    1 PAUSE "BANNER-H": PAUSE "(C) 81 TANDY":M=16:D=128
    2 INPUT "LETTER? ";A$(M):M=M+1: IF M<30 THEN 2
    3 FOR N=16 TO M-1: GOSUB A$(N):O=1
    5 C=A(O):A(O)=INT (A(O)/128):C=C-128A(O): IF C=D THEN 11
    6 IF C=73 PRINT " ##    ##    ##": GOTO 12
    7 IF C=65 PRINT " ##          ##": GOTO 12
    8 IF C=127 PRINT " ##############": GOTO 12
    9 D=C: FOR E=6 TO 12:A$(E)="  ":C=C/2: IF C<>INT C LET A$(E)="##"
   10 C=INT C: NEXT E
   11 PRINT " ";F$;G$;H$;I$;J$;K$;L$
   12 IF A(O)>0 THEN 5
   13 O=O+1: IF O=2 THEN 5
   14 PRINT " ": NEXT N: END
   21 "E"A=1205503:B=8393: RETURN
   22 "A"A=1184799:B=4008: RETURN
   23 "I"A=2089153:B=8385: RETURN
   24 "T"A=2089024:B=8256: RETURN
   25 "S"A=1205425:B=9033: RETURN
   26 "R"A=1254527:B=6346: RETURN
   27 "O"A=1073342:B=8001: RETURN
   28 "M"A=266367:B=16288: RETURN
   29 "N"A=133247:B=16260: RETURN
   30 "L"A=16639:B=129: RETURN
   31 "H"A=132223:B=16264: RETURN
   32 "U"A=16638:B=16129: RETURN
   33 "C"A=1073342:B=4417: RETURN
   34 "D"A=1073407:B=8001: RETURN
   35 "Y"A=115824:B=14344: RETURN
   36 "P"A=1188991:B=6216: RETURN
   37 "B"A=1205503:B=6985: RETURN
   38 "F"A=1188991:B=8264: RETURN
   39 "G"A=1138878:B=4933: RETURN
   40 "K":A=328831:B=8354: RETURN
   41 "J"A=16514:B=16129: RETURN
   42 "Q"A=1073342:B=7874: RETURN
   43 "V"A=17272:B=15366: RETURN
   44 "W"A=65919:B=16258: RETURN
   45 "X"A=133731:B=12692: RETURN
   46 "Z"A=1204931:B=12497: RETURN
   50 "0"A=1204926:B=8017: RETURN
   51 "1"A=2084993:B=129: RETURN
   52 "2"A=1139105:B=6345: RETURN
   53 "3"A=1204386:B=6985: RETURN
   54 "4"A=592396:B=639: RETURN
   55 "5"A=1337586:B=10065: RETURN
   56 "6"A=1201310:B=841: RETURN
   57 "7"A=1122752:B=14408: RETURN
   58 "8"A=1205430:B=6985: RETURN
   59 "9"A=1221808:B=7244: RETURN
   60 " "A=0:B=0: PRINT " ": PRINT " ": RETURN
   61 "$"A=2086162:B=4650: RETURN
   62 "%"A=143970:B=4499: RETURN
   63 "-"A=132104:B=1032: RETURN
   64 "!"A=16€3:B=0: RETURN
   65 "?"A=1138720:B=6216: RETURN
   66 "."A=387:B=0: RETURN
   67 "*" INPUT "A? ";A,"B? ";B: RETURN
   68 GOTO 60