
RS-232 Interface for the PC-2
Awhile back I wrote a post about the Radio Shack PC-2 (Sharp PC-1500) and included a section on the RS-232 interface which was available. I also wrote a post about connecting the TP-10 thermal printer to the PC-2, using the RS-232 interface. The TP-10 has a serial port for its interface, and if you have the RS-232 interface for the PC-2, you can connect it to any serial device, provided the baud rate of the device is 2400 baud or below.
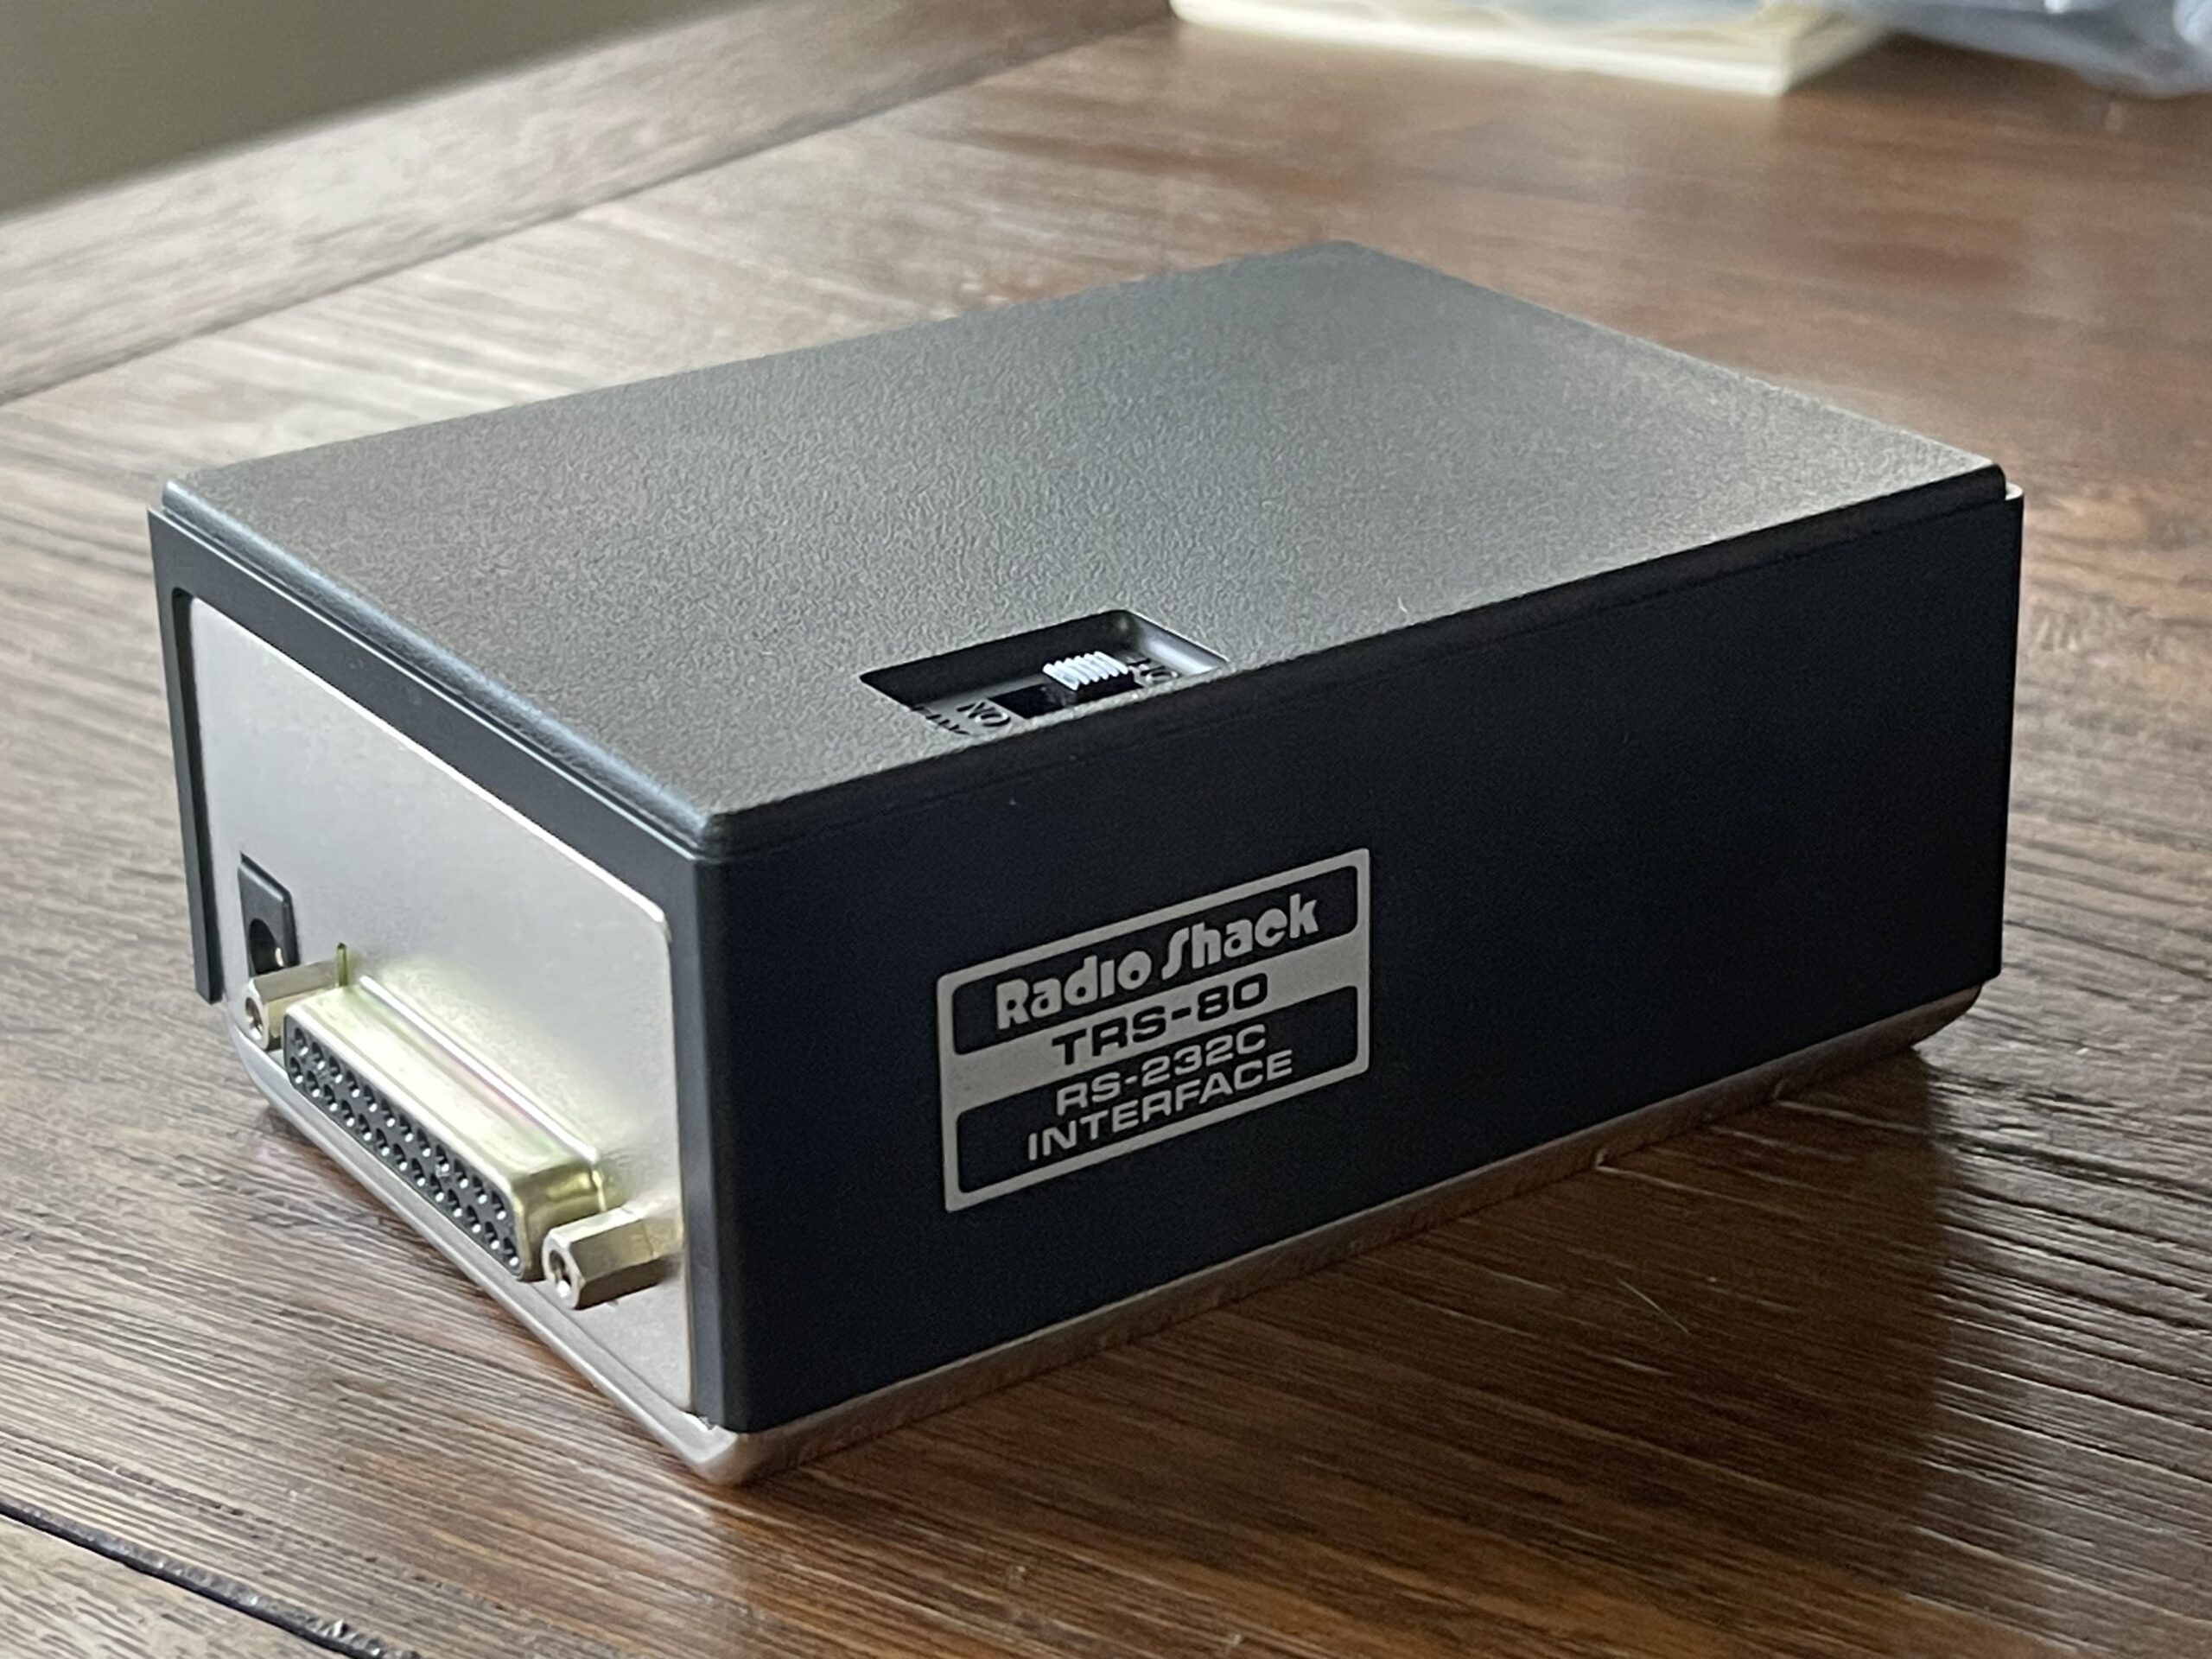
The RS-232 interface (catalog number 26-3612) for the PC-2 was first offered in catalog year 1984, a year after the release of the PC-2. The interface was not available the first year the PC-2 was released in 1983.

The RS-232 interface was priced at $199.95, which was the same price in 1984 as the PC-2 itself (after they dropped the PC-2 price from $279.95 to $199.95). This interface allowed the PC-2 to connect to terminals or modems up to 2400 baud, which at the time, was a big deal. This allowed the PC-2 to communicate between devices, other computers, terminals, and to the outside world. Having only a one-line display on the PC-2 however, was quite limiting.
The Radio Shack PC-2 was a rebadged Sharp PC-1500. Many of the Sharp PC-1500 accessories were also made available by Radio Shack for the PC-2. Sharp released a serial and parallel interface unit for the PC-1500, the CE-158.


Notice the Sharp accessory had a parallel port in addition to the serial port, while the Radio Shack version had only the serial port. I suspect the reason the Radio Shack version did not have the parallel port was due to the fact that the pinout was not directly compatible with any of the printers Radio Shack sold. It was likely a cost reduction as well.
Unobtanium
The RS-232 interface is a rare find on auction sites. Once in awhile a few will pop up. When they do, they sell for a premium. Most often they are missing the power adapter, metal mounting brackets, or keyboard overlay. With such a costly price tag on these interfaces, and limited screen size on the PC-2, they were not likely as common as other accessories might have been.
The interface was offered for only one catalog year, 1984, and by the time 1985 rolled around, the PC-2 and all of its accessories were out of the catalog.
All is not lost however, Jeff Birt has released a new version of these interfaces, more on this later.
I happened to pick up my first RS-232 interface quite awhile ago, and for just under $40. Mine did not come with anything but the module. I wrote up my experience replacing the NiCd battery pack and finding the replacement charger for this interface in this post. Since then, I have been able to connect my PC-2 to serial printers, TNCs for amateur radio, and other computers for transferring programs.
Since then, I have been looking for the metal mounting plates and other missing pieces. Without the mounting plates, I have been using a few old credit cards or other thin stackable plastic cards to keep the unit level with the PC-2 and / or the printer. It is less than ideal, but it does work.
Connecting to the PC-2
The interface connects to the PC-2 either directly to the left side via the 50-pin port on the PC-2, or, to the printer cassette module via the 50-pin port on the back. In either case, you need the metal mounting plates that came with the RS-232 interface which ensures the unit is level with the PC-2 and so that it does not move or get bumped when connected. This avoids stress on the expansion interface either on the PC-2 or the printer cassette module.

The mounting options for the RS-232 interface remind me of the kludgy connection for the PC-4 and PC-6 to the printer and / or cassette interface (Casio platform).

Refurbishing the RS-232 Interface
I had picked up two of these units from eBay. One quite awhile back which had nothing but the module itself. No instructions, no DC adapter, no metal mounting plates, and no internal battery pack. More recently I picked up another one of these which had everything but the metal mounting plates and keyboard overlay.

The more recent interface I acquired had the NiCd battery pack still in the unit, unfortunately. Luckily the damage was limited to the metal housing / frame and nothing made its way to the PCBs. I removed the metal pieces and soaked them in a citric acid solution to neutralize the potassium hydroxide from the NiCd pack. The metal appears to be galvanized or coated, which was a casualty of the electrolyte from the NiCd pack leaking. However, this is not visible when fully assembled.

I added a new ready-made NiMh “AA” x 4 pack.
The RS-232 interface I acquired long ago had the pack already removed. This prevented the certain damage that would have occurred if the NiCd battery pack had been left inside.

Correct DC Operating Voltage
With electronics this age, we must be careful to apply the correct voltage to the DC power input. With anything that had rechargeable batteries inside, the supply voltage was usually a bit higher. If you power the device without those batteries installed at the specified voltage, it could result in damage to the device. This is because the charging mechanism for the internal battery relied on that specific input voltage being higher, but also served as a voltage reducer or regulator. For example, with the printer, the 9 volt supply should only be used if the internal battery pack is present. Otherwise, a 6 volt supply should be used.
The DC adapter for this interface is 8.2 volts, center pin negative.
Charging
These devices do not have a charge control circuit, nor do the NiMh packs that are available as a replacement. If you leave them charging too long the pack will dry out.
The original NiCd packs were 500 mAh – adjust the charging time accordingly depending on the replacement pack you install. My replacement pack is 1,800 mAh. The owners manual for the RS-232 interface states that a full charge takes about 15 hours. If that is true, then a full charge for an 1,800 mAh pack would be a little more than 3 times that duration. Or, you can simply charge it to 1/3 of it’s capacity and limit to a 15 hour charge time. NiMh batteries do not suffer from the “memory” effect that NiCd packs did.
Software Support
The PC-2’s architecture allows for peripherals to supplement the PC-2’s BASIC command set. For example, when plugging in the printer, more BASIC commands for printing are available. These additional commands are provided by the ROM in the printer. The same happens with the RS-232 interface when plugged in. More BASIC commands are provided by the ROM in the RS-232 interface.
One thing to keep in mind is these additional BASIC commands disappear if these peripherals are not connected to the PC-2.
The BASIC support for use with the RS-232 interface is impressive. All sorts of integrations are possible and relatively simple with this interface due to it’s available command set in BASIC.
In addition to the additional BASIC commands, the RS-232 interface provides a robust terminal application in ROM as well. A keyboard overlay was provided with the RS-232 interface for use with the terminal application.

Since I have yet to find one of these included with an RS-232 interface, I printed my own. I took the image above and printed it on an overhead projector tranparency film sheet on my laser printer. I adjusted the scaling so that it fit correctly, and cut out the keys with an Xacto hobby knife.


The keyboard overlay came out alright, not the best, but it was an interesting attempt to recreate the one that is missing.
RS-232 Instead of Cassette Interface
Loading and saving programs from these pocket computers using the cassette interface is painfully slow. I believe it is 300 baud, as one of the Radio Shack catalog descriptions for the PC-4‘s cassette interface describes. You can use an RS-232 interface to load and save programs as an alternative to the cassette interface.
At 2400 baud (the fastest rate supported), loading programs using a PC is very much faster. Although a line delay is required, it is still an improvement. This allows simplified editing of programs on a PC and then they can be pushed to the PC-2 over the RS-232 connection. A delay is required between the header and content if loading the binary image, or, for each line if loading a program in ASCII mode, due to the tokenization needed after each line received.
On the PC-2, the cassette I/O can be redirected to the RS-232 interface:
SETDEV CI,COOnce cassette I/O is redirected, CLOAD/CLOADa and CSAVE/CSAVEa can be used to send or receive programs. There are some caveats to this, such as the pi (π) or square root (√) symbols.

When sending a program (using the CSAVEa command) which has the actual pi or square root symbol in the PC-2, these characters will not transfer correctly.


I created a test program on the PC-2 containing these symbols and sent it (using CSAVEa) to a PC using CoolTerm. These symbols were translated as “SQR ” and “PI ” by the PC-2 as they were transmitted over the RS-232 connection.
I then used SETDEV DO to redirect the output from PRINT statement to the RS-232 interface and printed a square root and pi symbol:
SETDEV DO

PRINT "√"
PRINT "π"
CoolTerm received the bracket characters “[” and “]”:


Interestingly, I did the reverse and the PC-2 received the square root and pi symbols! I used SETDEV KI to redirect keyboard input from the RS-232 interface, wrote a quick BASIC line to read a string from the RS-232 interface, I typed a “[” and “]” character in CoolTerm, then enter.
SETDEV KI

10:INPUT #-8,"TYPE";A$

To my surprise, the square root and pi symbols were in A$. I then wrote a small program in notepad++, using the brackets for square root and pi, sent it to the PC-2 (using CLOADa on the PC-2), and the program loaded with the square root and pi symbols.


When transferring a program from the PC-2 to a PC (using CLOADa and CSAVEa), search for “SQR ” and “PI ” and replace with a “[” and “]” before sending them back to the PC-2. If the ROM in the PC-2 were to be updated to not translate these characters to “SQR ” and “PI “, and instead output a “[” and “]”, loading and saving using CSAVEa and CLOADa would not require manual intervention.
Alternatively, instead of loading and saving programs using the ASCII format, you could save and load in binary format using the CSAVE and CLOAD commands. The binary format includes a header and will save and load the square root and pi symbols with no issues. The PC-2 requires about 100ms after the header for verification before the program contents are transmitted. In CoolTerm, I was unable to find a creative way to do this other than to set a packet delay of 100ms and a packet size of 27 bytes (the size of the header). This slows the transfer down a bit, but, it is not too noticeable at 2400 baud.
Interestingly, even when saving from the PC-2 in binary format, the square root and pi symbols are still represented as “[” and “]” as we can see from this capture of the following test program:
SETCOM 2400,8,N,1
SETDEV CI,CO

10 PRINT "√π"

CSAVE"TEST"
It would appear that there is a routine in the PC-2 which is converting these two symbols to “SQR ” and “PI ” in the CSAVEa function, but internally those characters appear to be represented by the ASCII values “[” and “]”. Of course this is of no concern or issue when using the CSAVE and CLOAD commands. These commands result in saving and loading of the memory contents directly and are not translated from tokenized BASIC to ASCII and vice-versa when using the CSAVEa and CLOADa commands.
What’s the Deal with √ and π?
Why do the √ and π characters cause us a concern? First, this concern would never come up when using the cassette interface (or more specifically the CSAVE and CLOAD commands). The concern appears when using the CSAVEa and CLOADa (ASCII equivalents). It might also be a concern if printing over the serial port or parallel port. Why?
The PC-2 is not a unicode system – it uses a single byte per character for character and string representation. ASCII is a method for representing characters using only 7 bits. This provides for only 128 characters. Many of these characters are non printable and control characters.


According to the table above, there is no 7-bit ASCII representation for √ or π. Therefore, the PC-2 needed a way to represent these characters internally. The designers of the PC-2 (or more accurately the Sharp PC-1500) chose to take the “[” and “]” ASCII character slots and make them √ and π respectively. The √ and π were the only two characters on the keyboard of the PC-2 which do not fit into the ASCII chart above. The PC-2 does not have a “[” nor “]” on its keyboard, so there is no interference with using these spaces in the ASCII table.
The end result is that there would be an issue when transmitting the √ or π out through the RS-232 and/or parallel port. The other device will see the standard ASCII “[” and “]” characters instead. The reverse is true also, if the PC-2 receives either a “[” or “]” character, then it will be displayed as “√” or “π”. I’ve actually seen this when using the PC-2 with a TNC.
Other Characters
I continued to search for any other interesting character mapping going on inside the PC-2. I wrote a program on the PC-2 to listen for bytes received on the RS-232 port. The program prints the character received (using the character mapping in the PC-2) and then prints the decimal value of that character or byte received:
10 SETCOM 2400,8,N,1 : WAIT 0
20 A$ = RINKEY$ : IF A$="" GOTO 20
30 BEEP 1 : PRINT A$;ASC A$ : GOTO 20
On the PC, I wrote a C# program to send a byte starting from a value of zero to 255, one byte at a time:
SerialPort port = new SerialPort("COM7", 2400, Parity.None, 8, StopBits.One)
{
	WriteTimeout = 2000,
	ReadTimeout = 2000,
	Handshake = Handshake.None,
	Encoding = Encoding.ASCII
};

port.Open();

port.RtsEnable = true;
port.DtrEnable = true;

byte x;

for(x = 128; x <= 255; x++)
{
	Console.WriteLine($"Sending {x}.");

	port.Write(new byte[] { x }, 0, 1);

	Console.ReadLine();
}

port.Close();
The results were interesting. I observed the following (all numeric values for the byte are decimal):
- 0 – null, PC-2 did not consider a byte received with RINKEY$
- 1-32 – blanks were displayed
- 39 – “insert” character was displayed instead of ‘ ASCII character
- 91 – √ was displayed instead of [ ASCII character
- 92 – ¥ was displayed instead of \ ASCII character
- 93 – π was displayed instead of ] ASCII character
- 96 – blank was displayed
- 127 – ▓ was displayed
The values not mentioned above were output as the expected ASCII character. When the highest order bit (bit 7) was set, the same results occurred. This indicates that bit 7 is not used by the PC-2 to index a character.
I output each of the characters that are either not available for keyboard entry or are remapped by the PC-2 (39, 91, 92, 93, 123, 124, 125, 126) using the banner program:

Since the banner program uses the PC-2’s internal bitmap for the font, the same would appear on the LCD if printed to the LCD.
CE-158X
Jeff Birt has made available a new RS-232 and parallel interface for the PC-2 (and Sharp PC-1500). This interface is not only a functional replication of the original CE-158, but it also has some new features added, such as higher baud rates. This allows the PC-2 to be connected to serial devices higher than 2400 baud.

For me, this was a major enhancement to the PC-2, since I can now connect it to some amateur radio equipment and printers which operate at 9600 baud or higher. Below is a list of additional features and benefits of the CE-158X as seen from having only the Radio Shack RS-232 interface available:
- No NiCd nor NiMh packs to worry about, internal battery pack not needed
- Modern 18650 battery can be added if desired
- Can be powered from USB port
- Parallel port
- Input mode has been added on the parallel port
- Increased baud rate up to 38400 baud
- Second serial port on the USB side at 19200 baud
- “Dial-a-ROM” to select original ROM and other ROMS with enhancements
- Padded “feet” at the correct height for connection to the PC-2 (no metal mounting plates needed)
- BPD+ can be used to save/load programs
Jeff has posted a video walkthrough of this device here. Jeff mentioned in both the user guide for the CE-158X and the video on the CE-158X a firmware update for the BPD+ is forthcoming. The BPD+ is a neat device which connects to a serial port and emulates a disk drive. I purchased one of these for my Model 100. This would be a great addition for the PC-2 to be able to load and save programs and data using a BPD+, eliminating the need to use a PC.
Final Thoughts
Not many pocket computers were packed with as many features, BASIC support, and peripheral options like the PC-2 was. In fact, not many had a parallel and/or serial port as an option. The PC-2 was the only Radio Shack pocket computer model which did. Of course cassette adapters and printers were far more common.
The RS-232 interface takes the PC-2 “online” and allows for connections to printers and other devices, unlike any other Radio Shack pocket computer model. These also allow for much faster saving and loading of programs, and even editing on a PC. However, these are a rare find today.
Thankfully Jeff Birt has created the CE-158X and has made them available for sale. This is a great option if you have a PC-2 or Sharp PC-1500 (or compatible models) and have yet to find one of the original interface modules. The CE-158X adds more features and improvements over the original, allowing for more interface options.
Up to this point, I was able to connect only a single serial device to the PC-2 at any given time. I was unable to connect both a printer (besides the 4-color plotter) and a serial device such as a TNC. Now that the CE-158X is available, I can connect (in theory) a parallel port printer and the TNC allowing me to automatically print out messages when they arrive for example.
I am working on connecting one of my POS thermal printers (parallel interface) to the PC-2, and when I finish that article, I will link to it here.